Whether it’s VHS, cassette tapes or photo slides, these old forms of media have long been replaced by digital alternatives. This also means the technology to showcase them on is disappearing.
It’s important to convert them before they are lost forever and the best slide to digital converter will do just that.
What are the best slide to digital converters? That’s what we wanted to find out.
To do that we looked at what they can covert, the speed and resolution along with other key specs such as size and weight. It enabled us to find the top four models out there.
Table of Contents
Thankfully for you, we’ve done all the research so you don’t have to! Along with our in-depth reviews, we’ve also written an extensive buying guide to give you all the info you need. By the time you get to the end, you’ll know the best slide to digital converter for you. Let’s get started!
Our Pick
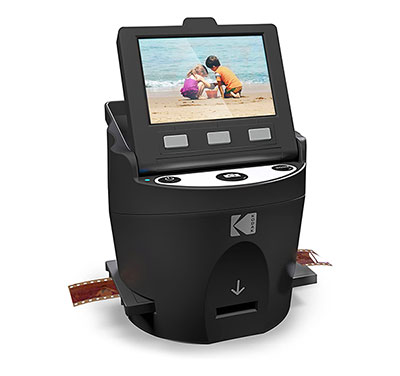
KODAK SCANZA Digital Film & Slide Scanner
KODAK SCANZA gives the images excellent quality and they can then be exported via one of its outputs which are TV-out, SD card, USB and HDMI.
This is our top pick as we loved the power and speed it has. It works very well and has excellent compatibility for digital conversation. The overall build quality is very high and we thought it was the best converter available today.
It can cover 35mm slides, 110 slides and 126 slides along with a wide variety of film sizes. To aid you in that scanning, it has a brilliant 3.5” LCD screen. This will allow you to control the converter while viewing your slideshow and editing images.
This all gets captured on its high-quality 14-megapixel sensor with the option of enhancing an image up to 22 megapixels.
A great addition is that the convertor also comes with all of the connection cables that you need. Plenty of other features give this excellent usability such as the adapter trays, intuitive buttons and the continuous loading it has for high speeds.
What we liked about KODAK SCANZA
We loved the versatility available for this device. It’s going to be able to scan a wide range of different slides along with film negatives. It will also be able to get the job done quickly and you’ll soon have all of those pictures digitized.
It is a standalone device so it doesn’t need to be connected to a computer but it does give you the opportunity to connect it should you want to transfer the data over there. Along with that, you have plenty of options to export those photos, including USB and SD card.
The quality here is also going to be fantastic with a resolution of up to 22MP which is a lot better than many other models. The LCD screen is another great feature as it’s large enough to clearly see what you’re doing while also being easy to use. We thought this converter was fantastic and ticked all the boxes of what you’re looking for.
The downsides
There is a lot to love about this converter and it’s hard to pick any faults with it. It’s one of the more expensive models out there but we thought it was worth it.
You’ll also be limited by the 22 MP resolution but this shouldn’t be an issue for most slides.
How to choose the best slide to digital converter
It’s vital that you get a converter that is perfect for your needs. The biggest factor in this will be ensuring you are getting a device that is compatible with the slides that you have. Once you know that, you can start to look at other features.
The image resolution is important as you’ll want to accurately recreate the image of the slide. If the resolution of the converter is lower than the image, then the quality will be a little lower. The exposure and color will also be important in determining this.
Once you’ve looked at the quality, it’s also important to think of the practical applications. Where are you going to put it? How quick do you need it to be? What support is offered? It’s good to get answers to these questions before you buy a slide to digital converter.
Best slide to digital converters
Wolverine Titan Film to Digital Converter
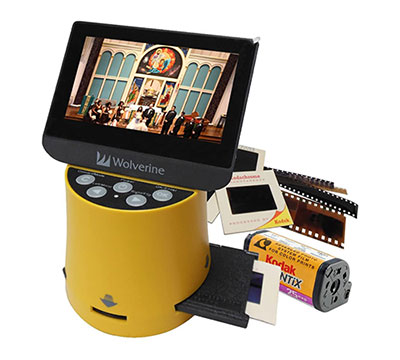
The fast-loading slide adapter will be able to get through a slide in just 3 seconds. If you have negatives to scan as well then this will only take a matter of seconds. It’s a speedy device and one that has immense qualities.
This could have easily been our top pick and was a close second. The first thing you’ll notice about it is the large 4.3” screen which is very easy to use. Despite the large screen, the converter is still able to stay quite portable and easy to move.
Resolution on this device is a respectable 20MP which should have no issue with recreating for slides. As with the Kodak model, compatibility here is very high and you’ll be able to scan through a whole range of different slide sizes.
It will convert the slides of negatives into JPEG images that can be easily stored on any device you want through the outputs of either SD card, HDMI or USB. It can’t digitize physical photo prints but that is common for such a device. Loading on the slides is also going to be a quick process.
What we liked about Wolverine Titan
The first thing we noticed about this converter was how quickly it was able to process the slides. This will reduce your frustration as you won’t be waiting impatiently for one to go through. It can also process negatives very quickly.
The large display is also fantastic and will allow you to easily control what’s on screen. It allows you to make a clear judgment on the quality while making any edits. The buttons under the screen are large and make it very easy to use.
Crucially, the quality of the pictures is also very good and they’ll be able to truthfully replicate those slides. It has a 20MP limit but that should be more than enough. On top of that, it also has plenty of output options which makes data transfer easy.
The downsides
The internal memory of the converter is fairly limited to around 40 pictures so you’ll want to have an external memory source connected right away.
As we mentioned, it’s not compatible with printed photos and you’d need another machine for that.
ZONOZ FS-3 All-in-1 Film & Slide Converter
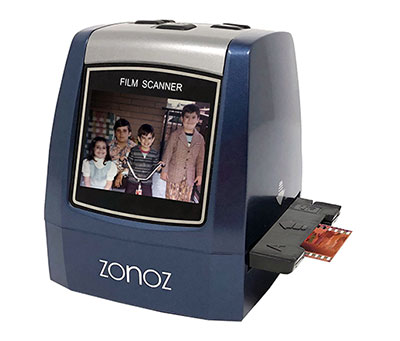
You’re not going to need a computer with this standalone device and your images can be automatically saved on an SD card.
Zonoz has been able to make this compact model which is another that has a high level of compatibility. It has an adapter that will allow you to capture 110, 126 and 35mm slides along with 126, 35mm, 110 and Super8 film so you should have no problems.
It comes with a wide range of accessories that include various cables, an adapter and also a cleaning brush. Perhaps the best accessory though is a 16GB SD card on which you can store all of your data. You can also choose to use the TV out or USB port.
The scanner can convert all of the details in your scans into a high-quality image. You’ll be able to see that image on the 2.4” screen that is very easy to use with its built-in software. This is all completed to a resolution quality of 22 megapixels.
It has been highly rated by almost all users that have used it for a long time and it’s easy to see why with the quality throughout.
What we liked about ZONOZ FS-3
This converter seems to be highly durable. You can use it for hours on end without a problem at all and even if you have a huge collection of slides, it will be able to cope easily. It will also process those slides quickly so you can get through them in no time at all.
Simplicity is at the heart of this device and it’s not going to take you a long time to master at all. When you do scan your slide, you can mirror or slip it easily. This prevents you from having to take the slide out and reversing it.
It adds to the ease of use and all of that is more compact than many of its rivals. It’s also cheaper than many other converters and that gives it excellent value for money. There is a lot to love about this converter and you’ll love using it.
The downsides
If you wanted to connect to your computer via HDMI then you’ll be disappointed that there isn’t a slot for it here. You can work around that but it may be frustrating for some.
Also, the buttons are above the screen which doesn’t feel as intuitive as on other models.
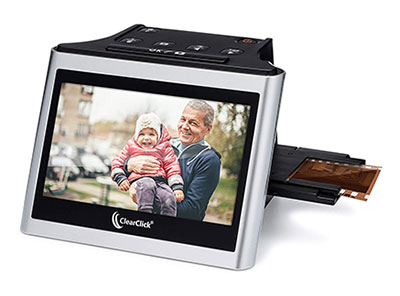
ClearClick Virtuoso 2.0
You’ll find the scanning to be very easy as the steps are simple and it’s also very quick, as are all the models we’ve reviewed here.
The final option we have to show you is the ClearClick Virtuoso 2.0. It’s another compact device that gives you plenty of versatility. It allows you to convert a wide range of negatives and slides into a digital photo and will do so at a resolution of 22MP.
Build quality is high here and it will easily cope with all of the slides that you have. That quality of the converter is backed by it having a two-year warranty which can be extended to three years, once you register it. You also get free tech support should you need it.
Compatibility here isn’t quite as high as on other models but it can still hold 3mm, 110 and 126 negatives along with standard 50×50 slides. The holders make it very easy to pass the slides through so you can get a lot done quite quickly.
Along with the compact converter, you also have the holders, USB cable, power adapter and a cleaning brush. The quality is impressive as it will scan them to a resolution of 22MP. Once scanned, then you can easily transfer them to wherever you wanted.
What we liked about ClearClick Virtuoso 2.0
The preview screen on this converter is an excellent 5” which gives you a great view of what you’ve scanned. It will also make it easy to adjust with the button on top. For the highest quality, you may want to touch up the pictures via a computer.
There are also plenty of connectivity options here, including HDMI for those that want to directly connect this way.
While the quality of the digital photos is important, so is the build quality of the converter. This is a model that you can rely on, especially if you have a vast number of slides to get through. It’s an impressive digital converter and another great option for you to choose from.
The downsides
While we loved the quality and efficiency of this converter, it doesn’t have the same level of compatibility as others.
It’s important to check it will be the right model for you. It also only has a short feeder which slows down the scanning process a little.
Why you should get the slide to digital converter
Getting a slide to digital converter is going to make your life a whole lot easier. It will allow you to convert any slides that you want and create a permanent digital record of them. Slides and film degrade over time so it’s best to get it done sooner rather than later.
Many people have slides that are going to have precious memories and a converter is going to have them without the cost of paying for a professional to do it. Getting a company to do them can be very expensive, especially if you have a large volume of slides.
These slide to digital converters can be costly but that cost is usually well worth the money due to the results. They’ll give you high-quality pictures that you can then cope onto which any device you want. This then gives you great versatility in how you can use the picture.
The good:
- Save old slides
- Easy to use
- Digital storage
- High quality
The bad:
- Cost
Things to consider before buying a slide to digital converter
Format compatibility
There’s no point getting a slide to digital converter if it’s not compatible with the slides you have. Before you even look at buying one of these converters you should take a look at your slides and see what type they are. You probably already know but it’s good to double-check.
Once you know the answer to that, you can automatically cross off any converter that doesn’t support it. It may also be that you have more than one sized slide to convert or perhaps you want to digitize negatives instead. If that sounds like you then you’ll need a model compatible with all types.
The Wolverine Titan is a converter that has a fantastic level of compatibility. Just for slides, it is able to read 135 (35mm) slides, 110, 126 and 127. That should cover everything that you have but it will also scan much more like that.
It can read the negatives of Microfiche, 127,135 (35mm), 126, APS and 110 along with the movie films of 8mm and Super 8. It’s a very impressive range and the other models on this list have similar capabilities but they’re not all the same.
Of course, the slide to digital converter isn’t going to have a lot for every single one of these slides as they would be inefficient. Instead, they come with plastic trays where you can slot in your slide flat onto it and slide it in to be digitized.
The quality of these frames is important as they need to hold the slide securely in place while not bending or damaging it in any way. We saw no issues with any of the converters we looked at as they all perfectly fit the slides.
As we mentioned, compatibility should be the first thing that you check. Everything after that will follow and you don’t want to be left disappointed. It’s best not to presume that you have the right converter as it’s best to check for sure.
Size
Where are you going to be using your converter? This is an important question to answer before you buy one as the question will determine what size is the best for you. Some may want a compact converter whereas others will want something more portable.
Due to this, it’s a good idea to earmark where it’s going to be stored to make sure you have an area big enough for it to fit in. If you are going to be traveling with it then the weight is also going to be an issue as you won’t want it to be too heavy.
All four converters here are a standalone model which means that they come with their own screen and don’t need a computer. That can mean that they are a little bulkier but thankfully the ones highlighted aren’t going to take up too much space.
Speed
One of the biggest differences between low and high-quality digital converters is the speed they’ll be able to scan at. On the cheaper models, you’ll put your slide in and wait a frustrating amount of time before you finally get the image you want.
If you have a large number of slides to scan, then speed is going to be important. All those extra seconds add up and you can end up spending hours converting those old slides. This can be too time-consuming for many.
Due to this, you’ll want a converter that can digitize your photo in a matter of seconds. That way, you can keep up a line of slides and complete the process much quicker. For those with boxes of slides, speed is vital to a smooth digitizing experience.
Image resolution
You want to be able to faithfully capture the image on the slide. To do this, you’ll want a converter that is going to at least match the quality of your slides. This is determined by the image resolution which is going to be measured in megapixels.
This is called the output resolution and generally the higher this figure is, the clearer the image is going to be. It also allows you to enlarge your image while still retaining its original quality. It makes it easier to edit and gives you an overall better picture.
It’s important to note here that the headline figure is simply the resolution that they are going to be able to support. This doesn’t mean that your old grainy image is suddenly going to become a clear 22MP image as it doesn’t work like that.
Any old or damaged slides aren’t going to be magically fixed and if the image was originally low-quality then it’s going to stay that way. The output resolution is important for when you have a high-quality slide and want to keep up that level of quality.
While all of that is true, some devices do allow you to edit the digital image which can give you a better use. Along with this, there is always to open of using computer software to touch up the image and get a much better result than the original.
Design
It’s always a good idea to look at the overall design of a product and see if it suits your needs. Most designs that can operate slides and negatives are actually quite small. They also don’t weigh much so you can easily store them away.
You should look at where the buttons are located along with where you input the slides and the slots for any cables. A lot of them will have a similar design but subtle changes could make the difference with you choosing one converter over another.
Computer vs standalone
A key question to ask is whether you should get a converter that needs to be connected to a computer or use a standalone model.
There are quite a few drawbacks to using a computer-dependent model with one of them being that you’ll need to download the software required to process the pictures.
Standalone devices are usually known to be quite bulky but with slide to digital converters, the opposite is true. With a standalone model, you have the benefit of in-built software, a screen to view your pictures and you don’t have to rely on a computer.
Exposure and color
When exposed to light and heat, certain colors from the slide will start to fade away and reduce the quality of the image. While a digital converter won’t be able to increase the resolution of the image or repair damage, some can help to restore the color back to how it originally looked.
A lot of these slide to digital converters will allow you to adjust the exposure and color to improve the picture. Not only can they do this but it’s also very easy to do with just a few button presses. You don’t have to be an expert to make some significant improvements.
If you are an expert at photo manipulation then you can always edit in in external software. This would be separate from your converter as you’ll need software such as Photoshop. More expertise is required here.
Screen
A great feature of all four slides we’ve looked at here is that they all have a display that will clearly show your pictures to get the perfect scan. Sometimes the preview is quite small but the larger screens can ensure you’re getting the level of quality you want.
Most of these screens will also provide a great base for editing the picture. They are usually very easy to navigate and mastering them won’t take long at all. It also means you won’t need to use a computer to digitize your photos.
How can I convert my slides to digital images?
If you want the highest levels of quality then using a digital image converter is going to give you the best results. While they have complicated technology inside of them, the process of which to digitize your slides is going to be quite simple.
Once you’ve turned on the converter, you can then select the type of slides that you’re going to be feeding through the machine. The screens on these models are usually quite easy to use and you’ll be able to easily go through the various settings.
After you have chosen the correct slide type, you can then put in the adapter, if one is required. Following this, you can then feed your slide into the machine and the image will form under the scanner. You can then capture the image. Once completed, you can then pull it through to the other side.
The next steps will be dependent on the type of digital converter you have but most of them are quite similar. At this stage, you can usually edit the images with the likes of brightness and contrast being altered. The editing here is usually fairly limited and for more advanced altering, a computer will be required.
Finally, you can then export your images however you’d like. This could be showing them on the TV, saving them on an SD card or sending them straight to a computer. Each device has its own output methods so it’s good to check the manuals.
What are my other options for digitizing slides?
While using a digital converter will give you high-quality results, it’s not your only option to digitize your images. Here we look at your other options.
Slide copier: If you have an expensive DSLR camera then you can buy an adapter to take picture of slides. These devices will fit onto the front of your camera and you can then take a photo of the slide and get quite good quality.
The problem with these slide copiers is that they are still quite expensive so you won’t be saving too much money when compared to a digital converter. It can also be difficult to get a slide copier that will be able to fit your camera.
Flatbed scanner: Another option to use is the flatbed scanner. This isn’t going to be a premium quality solution because the resolution isn’t going to be the highest. If you already have a scanner, however, then this could be your lowest cost option. We’ll go through this in a little more detail in the question below.
Photographing: You could also simply take a photo of the slide. This is a potential solution if you already have a slide projector. Along with the projector, you’ll also know need to have a matte white background along with a high-quality camera.
Once you have everything set up, you’ll then be able to take a photograph of the projection. It’s best to use a tripod for this so the image is as stable as possible. The results on this aren’t as great as other methods but it can be a good solution.
Professional: The other option is to hire a professional to complete the images for you. They will be able to convert as many slides as you want and give them back to you in any type of digital medium that you want.
While this is a solution that can produce excellent results, it can cost quite a lot of money, especially if you have a lot of slides. It can be a much more cost-effective solution to get your own converter which you can then use at your leisure.
Frequently Asked Questions
We think that the best slide to digital converter is the Kodak Scanza. It simply has all of the qualities that you’d want to see in a converter. Its primary feature is simply that the quality of the results is excellent and you’ll fall in love with your new digital images.
While the images are excellent, you’ll also find the converter to be easy to use with its large buttons that make the process as simple as possible. You also get plenty of outputs so you’ll easily be able to store your images wherever you want them.
While we thought it was the best converter around, any of the other three featured here could have justifiably be crowned as the best slide to digital converter. Whichever of the four you pick, you’re not going to go wrong.
The good news here is that all four of these models, the Kodak Scanza, Wolverine Titan, Zonoz FS-3 and the ClearClick Virtuoso 2.0 are all going to be able to convert 35mm slide into a digital copy. If that’s what you have, then all of them are going to be compatible.
Choosing the best one is going to be up to you. The final buying factor for you may well come down to the screen size or perhaps the placement of the buttons. As always, it’s vital to assess your own needs to come up with the right product.
As we’ve already mentioned, if we had to pick one then it’d be the Kodak Scanza for the reasons previously stated. 35mm is a common slide size so most of the converters you’ll find are going to be able to process it.
The short answer to this question is yes but it deserves a longer answer. The reason for that is because you can’t simply use a scanner as it is. The scanners aren’t backlit and therefore you won’t be able to see a clear image.
What you can do, however, is use some cardboard to create a holder for your slides. Printing patterns can be found online and you can place them above the slide. What this does is reflect the light that comes off the flatbed onto the slide which will give it the backlighting it needs.
Once it’s scanned you can then invert the colors and make any other edits that you may need. It doesn’t matter what size of slide it has as you can make a cardholder to match it. If you already have a scanner then the costs are going to be minimal.
The problem here though is that the quality isn’t going to be fantastic and won’t be close to the resolution you’d get from a slide to digital converter. It does though allow you to quickly digitize those images.
So you can scan slides on a flatbed scanner but it does have some serious downsides. You will have to create your own little cardboard structure and the quality isn’t going to be the highest. While it is possible, it’s not a method that we would recommend.
Slides unfortunately are quite sensitive. When exposed to moisture, light or heat the dye colors in the slide can start to fade. It can make the colors shift to a red or blue hue which can be corrected to a point but some slides become too damaged for accurate recovery.
There can be other problems too such as the film can get easily scratched or even have fungus growth if moisture has been left on the surface. Keeping them locked away in a dark and dry environment will keep them preserved but all slides will deteriorate which is why it’s a great idea to make them digital.
Each place will be slightly different in their prices but they all have a similar pricing structure. You will have a cost per slide and then you’ll need to pay for the medium that it’s delivered on. For example, you’ll pay $0.40 per slide and then $10 to have them on one USB drive.
To have 100 slides on a USB drive, you can expect to pay between $35-$40. This figure will then increase the more slides you want to convert. If you had 500 slides then you’ll have to pay around $160-$180 which in some places being a little cheaper or more expensive.
As you can see, they’re using a professional service can be good if you only have a few slides. Past a point, it doesn’t really become economical to do it. Having your own converter can cut down the costs and give you a permanent machine for future slide transfer.
Slides unfortunately are quite sensitive. When exposed to moisture, light or heat the dye colors in the slide can start to fade. It can make the colors shift to a red or blue hue which can be corrected to a point but some slides become too damaged for accurate recovery.
There can be other problems too such as the film can get easily scratched or even have fungus growth if moisture has been left on the surface. Keeping them locked away in a dark and dry environment will keep them preserved but all slides will deteriorate which is why it’s a great idea to make them digital.
Final Thoughts
After reading the buying guide you should now have a clear idea of what slide to digital converter would be the best option for you. The four we’ve looked at here are all brilliant and passed our tests but all of them still have their differences.
We appreciated all of the models we looked at here but we thought the best was the Kodak Scanza due to its level of functionality. It’s very easy to work with, will scan everything that you need it to and the results are going to be high-quality.
That being said, the Wolverine Titan could have easily been our top pick as it has many similar qualities.
If you were looking for something a little more compact then the Zonoz FS-3 is going to be a great option. It’s a little smaller than the others while still delivering the same level of quality. It has excellent durability for those who need to complete high quantity jobs.
For those who are looking for a large screen on which to view their new digital images, the 5” LCD of the ClearClick Virtuoso 2.0 is going to be ideal. It’s also going to be able to give you immense quality and a fantastic end product like all of the converters here.
We were truly impressed by all four of these slide to digital converters. All of them are great but it’s best to get the one that most closely matches your needs. Once you pick your favorite, you’ll be able to convert those old slides and precious memories before it’s too late.