The only thing worse than trying to decide what color to paint your kitchen is trying to figure out what type of primer you’re supposed to use.
Yeah, you’re going to need some primer on those cabinets before you go anywhere with that paint.
Otherwise, your hard work will just crack and peel like dry flaky skin. Flaky skin paint. That’s no good.
That’s what we’re here for. We know there’s a ton of kitchen cabinet primers out there and no easy way to tell which one does its job and which one flakes on you, literally.
There’s a lot of different aspects to take into consideration when choosing a primer, though we’ll get straight to the point for you time-savers. Here’s our pick for the best primer for kitchen cabinets.
Our Pick
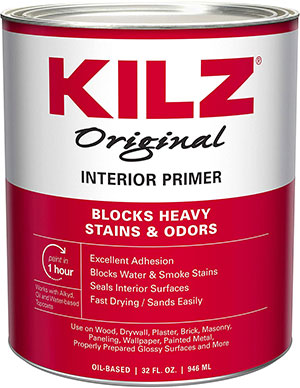
KILZ Odorless Interior Oil-Base Primer
Made just as well as it’s regular versions of primer, this odorless primer is perfect for kitchen cabinets.
Oil-based primers can serve as absolute game-changers in terms of what they can do for a paint job, as well as any stains or odors.
On the other hand, oil-based primers usually come with a catch: they have their own, equally toxic, and lightheaded fumes that can make breathing extremely uncomfortable.
Lucky for us, KILZ took the incentive to craft an odorless, oil-based primer and sealer. Applicable by brush, roller, or spray, this primer is primed and ready to cover every need of yours.
What’s great about this:
Made to the same quality standards as their regular primer, this primer offers little to no residual odor weeks after application. This makes it great for places such as offices, apartments, and even schools.
Drying to the touch within a half-hour and ready for a second coat by the end of a full hour, this primer is great if you’re new to painting and priming.
What’s not so great:
Despite lacking a lingering odor, there can still be a strong odor if proper precaution isn’t taken. As such, it’s best to wear gloves and practice safety when using it.
This primer, for the cost of being less strenuous on your nose, is a bit pricier than an average KILZ primer. However, you may find the cost worth it.
How We Picked The Best Primer for Kitchen Cabinets
When it comes to kitchen cabinet primers, there’s a variety of choices that largely rely on the type of wood you’re using.
Newer, unpainted cabinets without any stains can settle for using high-quality latex or oil-based primers, while painted wood would benefit specifically from oil-based primers and stained wood from primers that utilize stain-blocking. Some primers do twice the work, being a two-in-one paint and primer.
Though it seems simple at first, you can easily feel overwhelmed as you start to narrow down specific paint primers.
Rather than leave you to drown in the paint, we thinned out the competition and managed to pick out four solid kitchen cabinet primers.
The Best Primer for Kitchen Cabinets
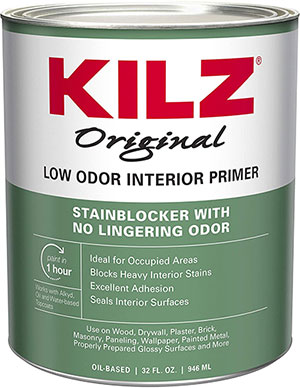
KILZ Original Multi-Surface Oil-Based Primer
Named Paint Brand of the Year in 2015, this primer can be used on walls or ceilings for stains and can be used on wood, drywall, plaster, brick, and more.
When it comes to picking a primer, you’re gonna wanna make sure that you get what’s most likely to do the job without fail. The only way you’ll get that is with an oil-based primer. Although KILZ is just one of many companies in the primer business, it stands out as a near progenitor in primers.
KILZ’s oil-based primer does exactly what the name implies – say goodbye to any stains or bad-smelling odors.
The best thing about this primer is that it dries to touch in 30 minutes, and is ready for a second coat after just an hour. KILZ has been in the premium primer and paint-making business for 40 years, and it shows.
What’s great about this:
It’s a primer from a reputable brand in the business. Blocks most stains, such as water, smoke, tannin, ink, pencil, felt marker, and even grease.
No more worrying about odors. This primer makes those bad smells hit the deck while setting you up for an awesome paint job.
What’s not:
With most oil-based primers, part of how they kill all other odors is leaving behind a mark of its own. Oil-based primers can give off fumes that can stick around for some time after a paint job.
To help circumvent this, try to get as much air circulation in the area as possible.
INSL-X PS800009A-01 Prime Lock Plus Alkyd Primer
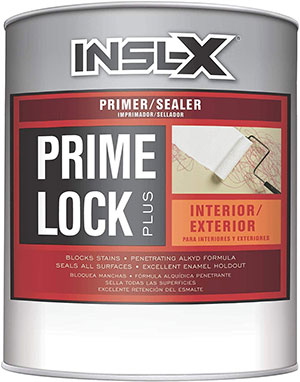
It’s fast-drying and, after an hour, a second coat goes on like butter.
INSL-X is another long-standing company in the business of primers and specialty coatings.
Their product line includes floor coatings, pool paints, spray paints, and even cleaning and prep products. Their website claims that INSL-X primers deliver the solution no matter the problem. With Benjamin Moore backing them, you can bet this primer is just as good as the one before it.
Much like KILZ’s primer, INSL-X offers a multi-purpose coating that primes and seals substrates and stains.
Above all else, it serves as an excellent adhesive to a variety of surface types.
What’s good about it:
Another champion in the business of primer and painting, INSL-X offers a high-quality primer and sealer for water stains, smoke damage, and more.
This particular primer has the benefit of super adhesion to glossy surfaces.
What’s not:
INSL-X advises against attempting to apply this primer when the temperature is lower than 45 °F (7.2 °C).
Additionally, you shouldn’t pain with this if it’s surface temperature is within 5 degrees of the dew point.
KILZ TRIBUTE Interior Satin Paint and Primer in One
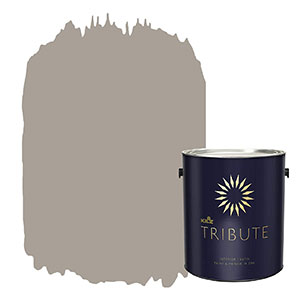
The coolest thing about this paint is the satin formula inside. It makes for a pearl-like, luminous paint that truly brightens up your home, making for a beautiful interior.
This primer is top-notch if you simply want to paint and prime all at once. No, that doesn’t mean you should mix your paint and primer in the same pan. Instead, KILZ comes in again with its paint and primer in one.
Also containing low VOC, this two-in-one comes in a variety of different colors and types. It offers all of the benefits of the previous primers, being usable on wood, drywall, and masonry in your home.
If none of that was convincing, this paint also comes with a lifetime limited warranty and it’s Greenguard Certified against VOC emissions. That’s hard to beat.
What’s good about it:
This two-in-one means making precisely one trip to the store, one preparation phase, and one paint job. Nothing is better than a quick and easy solution.
The unique make of this paint guarantees a transformative experience for the interiors of your home.
What’s not:
As a two-in-one, it’s twice the cost as our top pick. However, given that you’d be doing less work overall, you may find the extra cost is entirely worth it.
Why Should I Bother With Primer?
There’s a lot more to the purpose of a primer than preventing your paint job from crumbling and cracking:
- Your paint job will have a more uniform finish.
- Primer enhances the adhesiveness of your topcoat of paint, making it last longer and look better longer.
- It also blocks stains like tannin, water, grease, and smoke stains. Without primer, these would just bleed through your topcoat, ruining all your hard work.
If you’re that desperate, that two-in-one primer might be for you. Whatever you do, don’t attempt to paint without priming.
Purchase and Application Guide
If you’ve gotten this far, that means you’re dedicated to a once-and-done paint job. That’s what we like to hear.
Stick with us and we’ll see you through up until the job is finished. Afterward, show it off to your friends. They’ll all be jealous.
How Do I Pick The Right Primer?
The reality is that not all primers are created equal. Although using an oil-based primer will usually get the job done in most cases, you may find it better to use specific types.
For example, a primer formulated for outdoor use may not have the best applications when used indoors.
On the other hand, you can skip the hard road and go for a primer made for indoor and outdoor use. Outdoor primers specialize in protecting surfaces from cracking, erosion, and mildew, things that an indoor primer can’t.
Because of this, it’s best to note what type of surface you’re painting on, and what features your chosen brand of primer offers.
New Wood
If your wood is new, unpainted, and unstained, you’re in luck once more.
You can stick with an oil-based primer or if you’re a bit seasoned and want to experiment, high-quality latex-based primer works just as well.
Stained Wood
Stained wood, in addition to redwood or cedar, requires a primer that specializes in stain-blocking.
Most primers offer this by default, so this shouldn’t be an issue.
Painted Wood
This type of wood serves as the one exception in which you can jump straight into the painting phase. If the previous paint job is in good enough condition, you may not even need a primer before painting.
However, if your paint is chalking or chipping, stick with an oil-based primer. Right before you throw the primer on, prepare the surface by removing as much chipped paint as possible, and washing and degreasing as usual.
Weathered Wood
Weathered wood goes the same way as newer wood. Either a high-quality latex primer or an oil-based primer will get the job done.
Before priming, sand the wood to get rid of as much paint as possible. Once you notice the new wood fibers, you can get started.
How to Apply the Primer?
There aren’t many steps in the process of applying primer to kitchen cabinets.
If you follow our guidelines exactly, you’ll be cooking again in no time.
Step 1: Remove your kitchen cabinet doors
This is something that professionals do all the time. Rather than twisting and turning to fight for that perfect painting angle, break out the toolbox and liberate those doors.
Place them on a flat, covered surface, or any place you wouldn’t mind getting extra paint on.
Step 2: Degrease your kitchen cabinets
As with all wooden furniture, wooden kitchen cabinets easily absorb oils and grease from foods, as well as your fingerprints, any pets, and who knows what else?
Trying to paint over all of that untouched dirt and grime will only spell disaster several months later.
Mixing some soap and water in a bowl is enough to clean all of that stuff out. If you have it, replacing soap with a degreaser works just as well.
Make sure to give extra attention to any cabinets near the stove and general cooking area. Dry your cabinets as much as possible before moving on to the next step.
Step 3: Sand your cabinets
Although you could forgo this step in the process of priming your cabinets, sanding them is a great way to ensure that you achieve a smooth and even finish.
Sanding your kitchen cabinets also means removing any surface pimples (or imperfections), and creating small, rough ridges that allow for better adhesion.
For the most part, stick with medium-grit sandpaper in the 100-120 range.
When finished, make sure to get rid of any wood dust.
Step 4: Apply the primer
To make sure your paint job is nice and even, start at the top of the cabinet door and brush across the grain. When you reach the end, lightly pass the brush over the wet finish in the direction of the grain using a single stroke.
Doing this helps minimize any excess, as well as making for a flatter, even finish. Any paintbrush will do, though we recommend using a 2 ½ – 3 inch-wide angled sash brush.
You usually only need one coat of primer before moving on. If your cabinets are particularly dark, two coats may be necessary. Without the extra coat, the paint you put on dark wood may not look as well on such a dark surface. It also adds extra protection to the cabinet.
How Long Should Primer Dry On Cabinets?
For the most part, the wait time isn’t anything too long. After you finish the process of applying the primer, you only have to wait 24 hours at a minimum.
If it’s particularly humid and you want a guarantee, check the label to see how to go forward. Regardless, there’s no danger in waiting longer than 24 hours.
Does Primer Have To Be Perfect?
Mistakes only help us remember we’re human, and the same can be said with primer. The primer coat doesn’t have to be a masterpiece, as long as it fully covers the surface you’re painting on.
Additionally, you should avoid any drips or visible unevenness. As the purpose of primer is to give the surface adhesive properties, any major issues like the ones listed above can make or break a paint job.
How Do You Keep Painted Kitchen Cabinets From Chipping?
If you’ve followed this guide to the letter – that is, you cleaned the surface, sanded, and used primer, you should be good more or less.
On the other hand, if you’re particularly vigilant, some primers were designed to prevent peeling. These primers are made to form a bond that makes the next coat of paint last even longer.
When purchasing these, look out for any labels that say “peel stop” or “peel bonding primer.” Best of all, if you’ve already painted, you can easily throw these primers over an existing coat of paint – but only after degreasing the surface first.
Taking things a step further, certain high traffic areas on cabinets such as handles or knobs are at more significant risk of peeling.
This is mainly because, in high traffic areas, fingers and fingernails routinely come into contact with the paint. To prevent this entirely, before throwing those kitchen cabinets back up, add at least one layer of a protective topcoat.
Conclusion
The kitchen is responsible for some of the greatest smells that can fill a household. It only makes sense that you’d also want it to be just as bright and colorful for your cooking time, any visitors, or just to see a good job done beautifully.
However, before you prime your paint for your kitchen cabinets, be sure to prime a good primer. That way, you’re fully primed and ready to paint. Painting and priming. Primetime painting. Paint primetime.
All of the above.